|
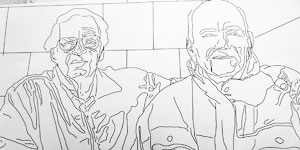
This is the original photograph of my husband (in green jacket) and his cousin. It was taken at the Getty Museum in Los Angeles. |
|
After cropping and flipping the image in Photoshop, I traced the figures in Illustrator (an Adobe digital drawing program) so that I have a rough drawing with accurate proportions. |
|
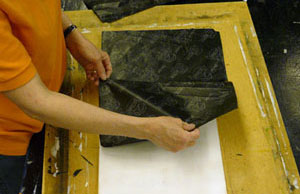
I paint the board with gesso and then sand it smooth. I use finish-grade birch plywood. Over the 30 years I've been doing woodcuts, the manufacturers have significantly reduced the thickness of the top layer. The gesso provides more depth and stabilizes the thin veneer. |
|
I place translucent paper over the computer drawing and then redraw the image to refine it. |
|
Once the line drawing is complete, I transfer the image to the block using carbon paper. |
|
As I go along, I check to make sure all of the lines are transferred. |
|
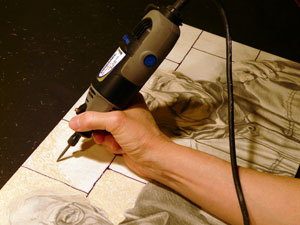
Once the line drawing is transferred to the block I complete the drawing with pencil. Here is the block with the finished drawing. Before I cut, I spray the drawing with Varithane to keep it from smearing. After the spray coat dries, I paint on another coat to provide more depth of cutting surface. |
|
I usually start with the harder parts of the images--the faces. I use very small v gouges to cut the fine lines of the faces and hand. The light to the side of the image helps show the grooves. |
|
Here is a closeup of the image and the v gouge. The cuts are just barely visible. They don't have to be very deep at all. |
|
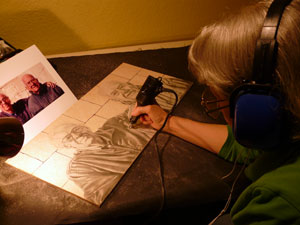
I use a Dremel and various bits to achieve the textures I want. Here I am working on the background of the image. The surface of the block (which will print black) is white and the cut-away areas (which will not print) are pinkish. |
|
I also use an electric engraver. This tool has bit which punctures the surface with very small holes. The more holes there are, the more white space there is in the images once it's printed. It is a very noisy tool, so I use ear protectors. |
|
Here is the block after all of the cutting is done. It's ready to be proofed.
Click to go on to the printing process.
Return to top. |